Java Psion Link Manual
Connecting
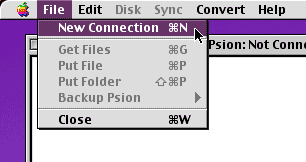
- Choose "File-New Connection" from the Menu.
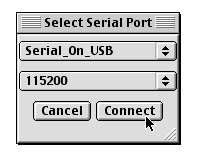
- Select the Serial Port and Baud Rate then press Connect.
Make sure the baud rate matches that on your Psion and that
the "Link To The Desktop" is on.
- You should now be connected. If the connection fails, try again. If it still fails try closing JPL and trying again.
Navigating
Once you have connected you should be able to navigate your Psions directory structure in a similar manner to using the Psion itself.
In particular you can use either the mouse or the keyboard to navigate. Folders are opened by selecting them, then clicking on them. This is not the same a double-click, a folder that is already selected requires only one click to open it.
Most keyboard shortcuts that are available on the Psion are also available in JPL. They arrow keys can be used tomove around. Esc will take you to the "Close" folder icon. Pressing a letter will let you cycle through the files starting with that letter and so on.
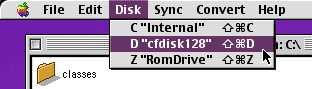
To change the disk you are currently looking at, use the disk menu:
Transferring Files
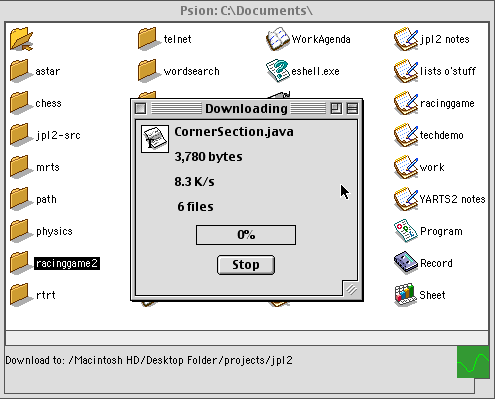
Downloading
- Select the files and folders in the JPL window (using shift/control/apple to select multiple files).
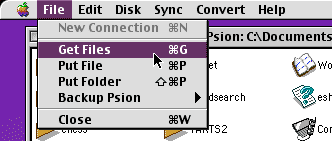
- Then select "File-Get Files" from the Menu.
- The files will then be transferred to you "Download Folder". The
"Download Folder" is shown at the bottom of the JPL window (e.g.
"Download to: /Macintosh HD/Desktop Folder/projects/jpl2 ). To change
where the files are downloaded choose "Edit-Change Download Folder"
from the menu.
Uploading
There are 3 ways to upload a files to the Psion using JPL:- Choose "File-Put File" from the Menu to upload a single file to the current directory.
- Choose "File-Put Folder" from the Menu to upload a folder to the current directory.
- Drag and Drop the files you want to upload into the JPL window.